-
I need that! I'm a more for fashion scarf person but I live in Utah so I guess it gets to the NEED point about October. I'll claim both.:)
- You are the big winner of a crocheted ruffled scarf! E-mail me at emmaheare@gmail.com so we can choose a color for your scarf and I can get it sent off to you.
Thursday, August 11, 2011
Winner!
Congrats to commenter number 5!
Tuesday, August 9, 2011
Little Boy Tie
I've seen a lot of posts for ties but have been really hesitant to make one. They look pretty complicated and some patterns were like a million pages long it seemed like. Then I found a tutorial on Lil Blue Boo that I felt pretty confident I could handle. And guess what? I did! It took a little time but it wasn't that hard at all. The tutorial says it's a toddler tie but mine came out a little bigger than toddler size. Take a look for yourself.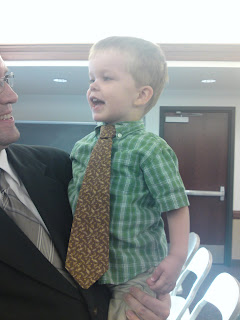 It's not horribly large but definitely on the large side. I originally was going to make it for my toddler. When it came out so big, I figured it would be perfect for my six year old. I had to bribe him to even try it on - he's stubborn just like me. He wouldn't wear it, so back to Benj it went - he'll grow into it eventually.
The pattern for the tutorial is pretty cool since you can make it an actual tie that you tie or one with elastic. And like I said before, very simple to follow. The best part - you can make it with a fat quarter! A lot of other patterns I looked at had you cut on the bias, but not this one. So, when fat quarters go on sale, this tie can be made super cheap. I am going to try another one but this time I am going to scale down the pattern just a bit to see if it comes out a little smaller. I'll let you know how it works out. Happy tie making!
Remember, giveaway deadline is tomorrow at 11:59pm mountain time so check out the crocheted ruffled scarf and enter to win one in the color of your choice. There are so many ways you can wear this scarf, it's a must have accessory. Check it out!
 It's not horribly large but definitely on the large side. I originally was going to make it for my toddler. When it came out so big, I figured it would be perfect for my six year old. I had to bribe him to even try it on - he's stubborn just like me. He wouldn't wear it, so back to Benj it went - he'll grow into it eventually.
The pattern for the tutorial is pretty cool since you can make it an actual tie that you tie or one with elastic. And like I said before, very simple to follow. The best part - you can make it with a fat quarter! A lot of other patterns I looked at had you cut on the bias, but not this one. So, when fat quarters go on sale, this tie can be made super cheap. I am going to try another one but this time I am going to scale down the pattern just a bit to see if it comes out a little smaller. I'll let you know how it works out. Happy tie making!
Remember, giveaway deadline is tomorrow at 11:59pm mountain time so check out the crocheted ruffled scarf and enter to win one in the color of your choice. There are so many ways you can wear this scarf, it's a must have accessory. Check it out!
Friday, August 5, 2011
Another Ruffled Scarf - Giveaway Style
This giveaway is now closed. Check out other posts for links to awesome tutorials and check back later for more giveaways!
Wow - this is getting out late. The whole reason I pushed back until today was so I could have my super cute niece model for me and I never got around to calling her. Sorry, you'll have to suffer through the pictures I took this afternoon. I am so not a photographer.
Anyway, this tutorial comes from Aesthetic Nest again. I posted another tutorial from this site, my first project on this site in fact, the cloche (or baby hat). So if you want to see some really good pictures of what this scarf looks like, check out the full tutorial with her pictures - they are much, much better than mine. Anyway, enough talking about the pictures, here they are.


 As the hanger and the dog model so well, you can see that this scarf can be worn multiple ways. And it's super ruffly. Fun, fun. I am so not kidding when I say this is about as easy as it gets when it comes to crocheting - a big ol' chain and lots of double crochets. Even if you don't know how to double crochet, she has lots of great step by step pictures to get you through it. Still don't want to make one for yourself? Not a problem because it's giveaway time!
The winner of this giveaway will get a super ruffly scarf, made by me, in the color of your choice - limited only by what colors they have in stock at Hobby Lobby. So how do you enter? Easy, just leave a comment on this post telling me if you are a "scarves keep you warm" kind of person or "scarves are a fashion statement" kind of person. I used to be a "keep you warm" but I'm starting to lean to the the "fashion statement" side of things. (Only one comment per person please - multiple comments will be deleted.) Hurry and enter before Wednesday, 10 August because that's when the giveaway will end, at 11:59pm. One comment will be selected at random and will be announced on the blog the 11th of August. I will then contact you to get your color choice. Happy commenting and good luck!
Wednesday, August 3, 2011
Tote Bag
No giveaway today. Sorry. I want to get a better picture, so I think I will ask my niece to model for me. So check back on Friday for the tutorial, pics, and instructions for entering!
Today's post is for a cute little tote bag with an applique on the front. You could leave it blank if you wanted, but I think the applique gives it that something extra and personalizes it a bit. The tutorial comes from Craft Snob and was part of a 4-part sewing basics series. I made one other thing from the series which I will post about later. This tutorial was so easy to follow, I am going to make a few more of these bags. It did take me a kind of long time to make though, only because I went a little crazy on the appliques. I needed lots of practice so I figured this project was as good as any. Okay, pictures and then I'll tell you a little more about it.
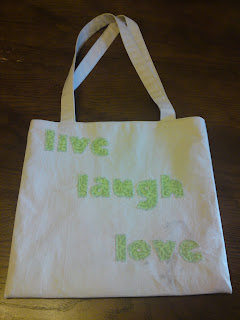
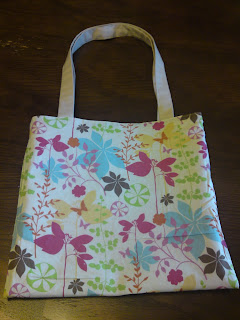
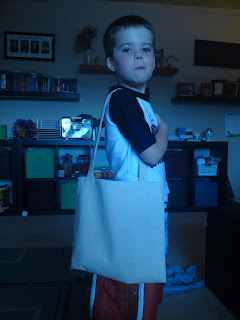 Number one thing I love about this tote, it's reversible! Wahoo! Who doesn't love a reversible bag? And with it being so easy to make, even better. In the tutorial, Wonder Under was used to attach the applique before sewing. I didn't have any and I really don't like the stuff either, so I just used some fabric adhesive which I had on hand. Worked like a charm. I also made mine a tiny bit bigger than the original tutorial. I am planning on making at least two more bags and using them as library book totes and some of those picture books are big. I'm done carrying all the books home from the library. I am going to applique the boys names on the front so they each have their own to carry their books. I'm kind of excited about them. I'll post pics of the boys bags when they are done. Last thing about my bag - I thought about it after I was all done appliqueing, but since it's a library bag, it would have been cute to put "live laugh read". Oh well, I was not about to unpick all that stitching.
Happy tote bag making and make sure to check back on Friday for the next giveaway!
Today's post is for a cute little tote bag with an applique on the front. You could leave it blank if you wanted, but I think the applique gives it that something extra and personalizes it a bit. The tutorial comes from Craft Snob and was part of a 4-part sewing basics series. I made one other thing from the series which I will post about later. This tutorial was so easy to follow, I am going to make a few more of these bags. It did take me a kind of long time to make though, only because I went a little crazy on the appliques. I needed lots of practice so I figured this project was as good as any. Okay, pictures and then I'll tell you a little more about it.


 Number one thing I love about this tote, it's reversible! Wahoo! Who doesn't love a reversible bag? And with it being so easy to make, even better. In the tutorial, Wonder Under was used to attach the applique before sewing. I didn't have any and I really don't like the stuff either, so I just used some fabric adhesive which I had on hand. Worked like a charm. I also made mine a tiny bit bigger than the original tutorial. I am planning on making at least two more bags and using them as library book totes and some of those picture books are big. I'm done carrying all the books home from the library. I am going to applique the boys names on the front so they each have their own to carry their books. I'm kind of excited about them. I'll post pics of the boys bags when they are done. Last thing about my bag - I thought about it after I was all done appliqueing, but since it's a library bag, it would have been cute to put "live laugh read". Oh well, I was not about to unpick all that stitching.
 Happy tote bag making and make sure to check back on Friday for the next giveaway!
Tuesday, August 2, 2011
Make-up Brush Case
So I was going to post yesterday but obviously I didn't. 1 - because I didn't take a picture of the project I wanted to post about while my son was wearing it and 2 - I spent practically the whole day trying to recover from the huge mess I left in my other son's room getting ready for the yard sale we had this past Saturday. But I'm back and I have something different to post.
I made this case fairly soon after I had started sewing and I didn't have too many problems figuring it out. It is very customizable for whatever size brushes you have in your make-up collection. I found this tutorial at The Sewing Republic. They have lots of great tutorials! The creator of this tutorial is from Chickpea Sewing Studio. It's really nice to have a place to keep my brushes away from all the other junk that is in my bathroom. Especially since I spent way too much on them. Anyway, here's how mine turned out.

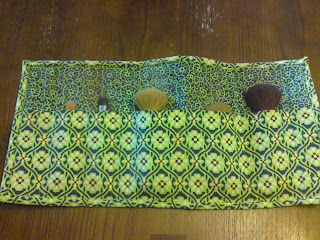 I changed a few things. Most obvious was the shape of the case. I can barely bind a straight corner, let alone a curved one so straight it was. She also had a magnetic snap on hers. It looked a little too complicated for me so I was going to put a button and elastic to keep it closed. I put the elastic in but never got around to the button part. It stays closed on its own so I wasn't ever too worried about finishing it. You can use this same idea to hold other things as well like knitting needles, crochet hooks, or other such stuff. There are a lot of tutorials like this one that hold crayons or colored pencils. This one is different in that it has a stiff interfacing in it to hold its shape. Anyway, enough rambling. Have fun making your own make-up brush case.
I'm thinking another giveaway is in order. So look for either tomorrow or Friday!
Subscribe to:
Posts (Atom)